Creating A Working Form using HTML, CSS, PHP

Today we will be creating a working HTML, CSS, and PHP form using almost every tag. The HTML and CSS layouts are very simple as our main focus would be configuring PHP. and creating a backend database to work with this form. Starting with our HTML. We will be creating a very basic HTML form with basic input tags. I will be sharing the HTML code below.
HTML
<!DOCTYPE html>
<html lang="en">
  <head>
    <meta charset="UTF-8" />
    <meta http-equiv="X-UA-Compatible" content="IE=edge" />
    <meta name="viewport" content="width=device-width, initial-scale=1.0" />
    <title>Form</title>
    <link rel="stylesheet" href="./style.css" />
  </head>
  <body>
    <div id="container">
      <h2>Personal Details</h2>
      <form method="post" action="action.php" enctype="multipart/form-data">
        <label for="Fullname">Name:</label>
        <input id="Fullname" type="text" name="name" /><br /><br />
        <label for="Pass">Password:</label>
        <input id="Pass" type="password" name="password" /><br /><br />
        <label for="E-mail">E-mail id:</label>
        <input id="E-mail" type="email" name="email" /><br /><br />
        <label>Gender:</label>
        <input id="Gen" type="radio" name="Gender" value="Male" /><label
          for="Gen"
          >Male</label
        >
        <input id="Gender" type="radio" name="Gender" value="Female" /><label
          for="Gender"
          >Female</label
        >
        <br /><br />
        <label for="contact">Contact#:</label>
        <input id="contact" name="contact" type="text" /><br /><br />
        <h2>Educational Qualification</h2>
        <label for="Degree">Degree:</label>
        <select name="Degree" id="Degree">
          <option>Select Group</option>
          <option value="Bachelor">Bachelor</option>
          <option value="Diploma">Diploma</option></select
        ><br /><br />
        <label for="Engineering">Engineering:</label>
        <select name="Engineering" id="Engineering">
          <option>Select Group</option>
          <option value="Electrical">Electrical</option>
          <option value="Mechanical">Mechanical</option>
          <option value="Software">Software</option></select
        ><br /><br />
        <label>Hobbies:</label>
        <input type="checkbox" id="Hobby1" value="chess" name="Hobby[]" />
        <label for="Hobby1">Playing Chess</label>
        <input type="checkbox" id="Hobby2" value="Books" name="Hobby[]" />
        <label for="Hobby2">Reading Books</label>
        <br /><br />
        <h2>Address</h2>
        <textarea name="Address"></textarea><br /><br />
        <label for="Resume">Attach Resume:</label>
        <input type="file" name="file" /><br /><br />
        <input name="submit" type="submit" value="upload" />
      </form>
    </div>
  </body>
</html>

CSS
This is how the form will look now We will add a little bit of CSS to make it presentable. You can check the code for CSS below.
body{
    background-color: aqua;
}
table{
    border: 2px solid red;
}
label{
    font-size: 20px;
}
#container{
    text-align: center;
    border: 2px solid red;
    width: 600px;
    margin-left: auto;
    margin-right: auto;
}
form{
    text-align: center;
}
form input[text]{
    width: 200px;
}
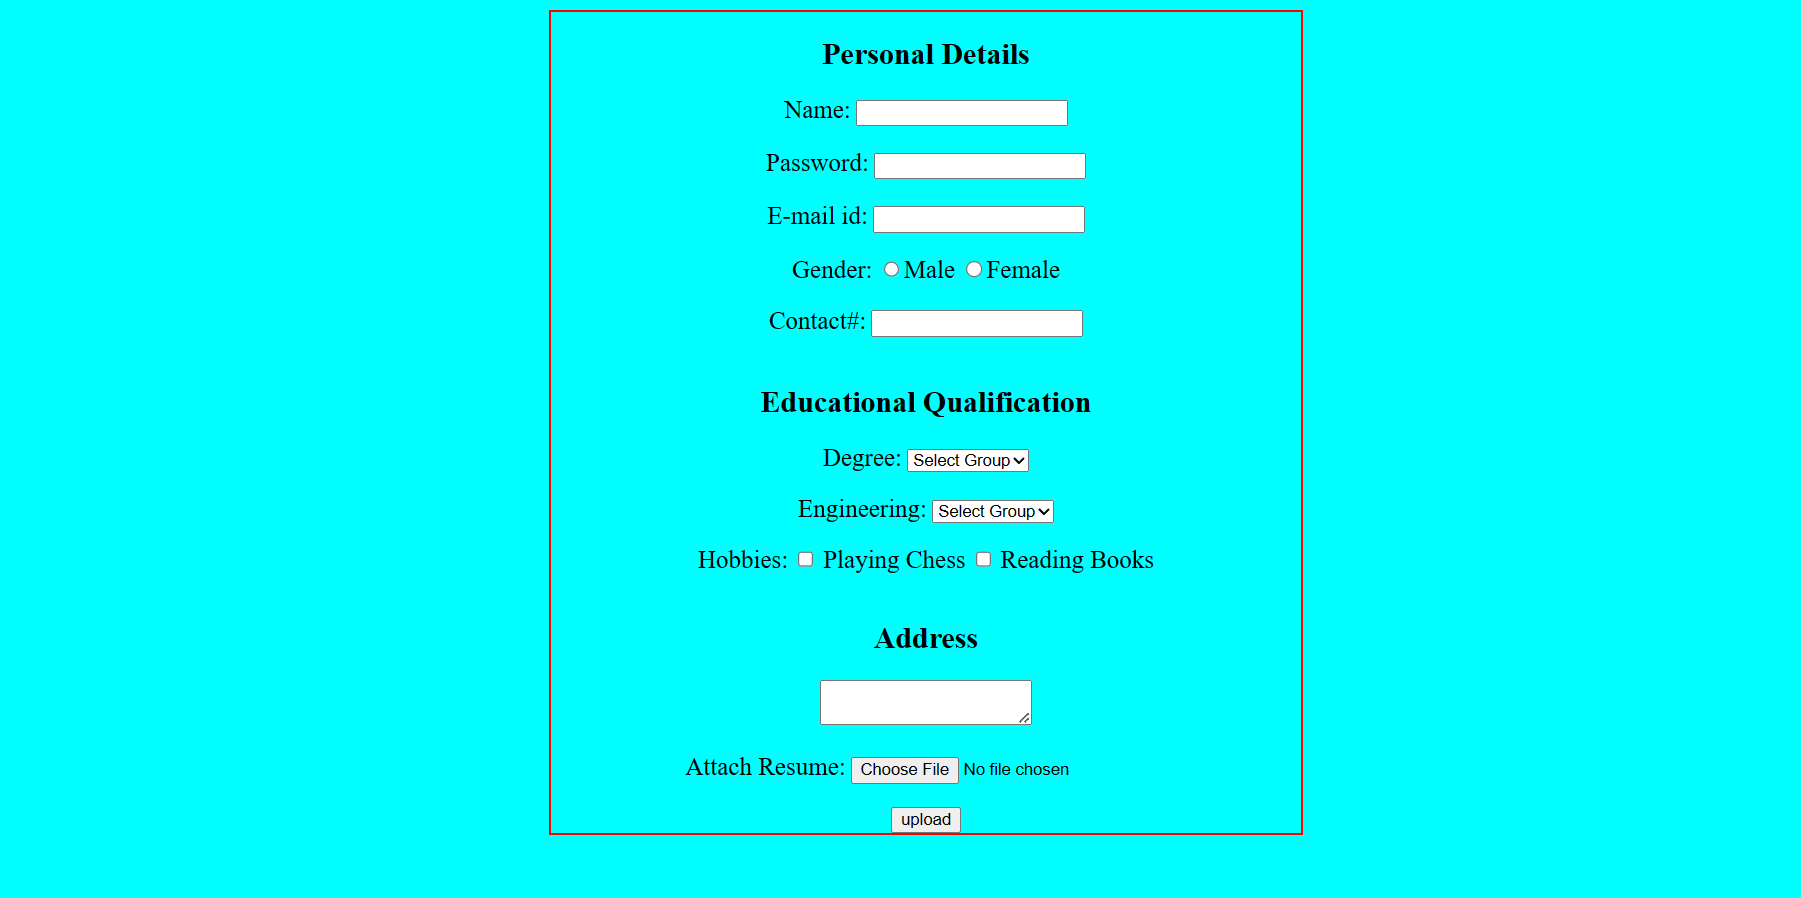
This is the final look of the Document with the CSS. Now we will move on to PHP.
PHP
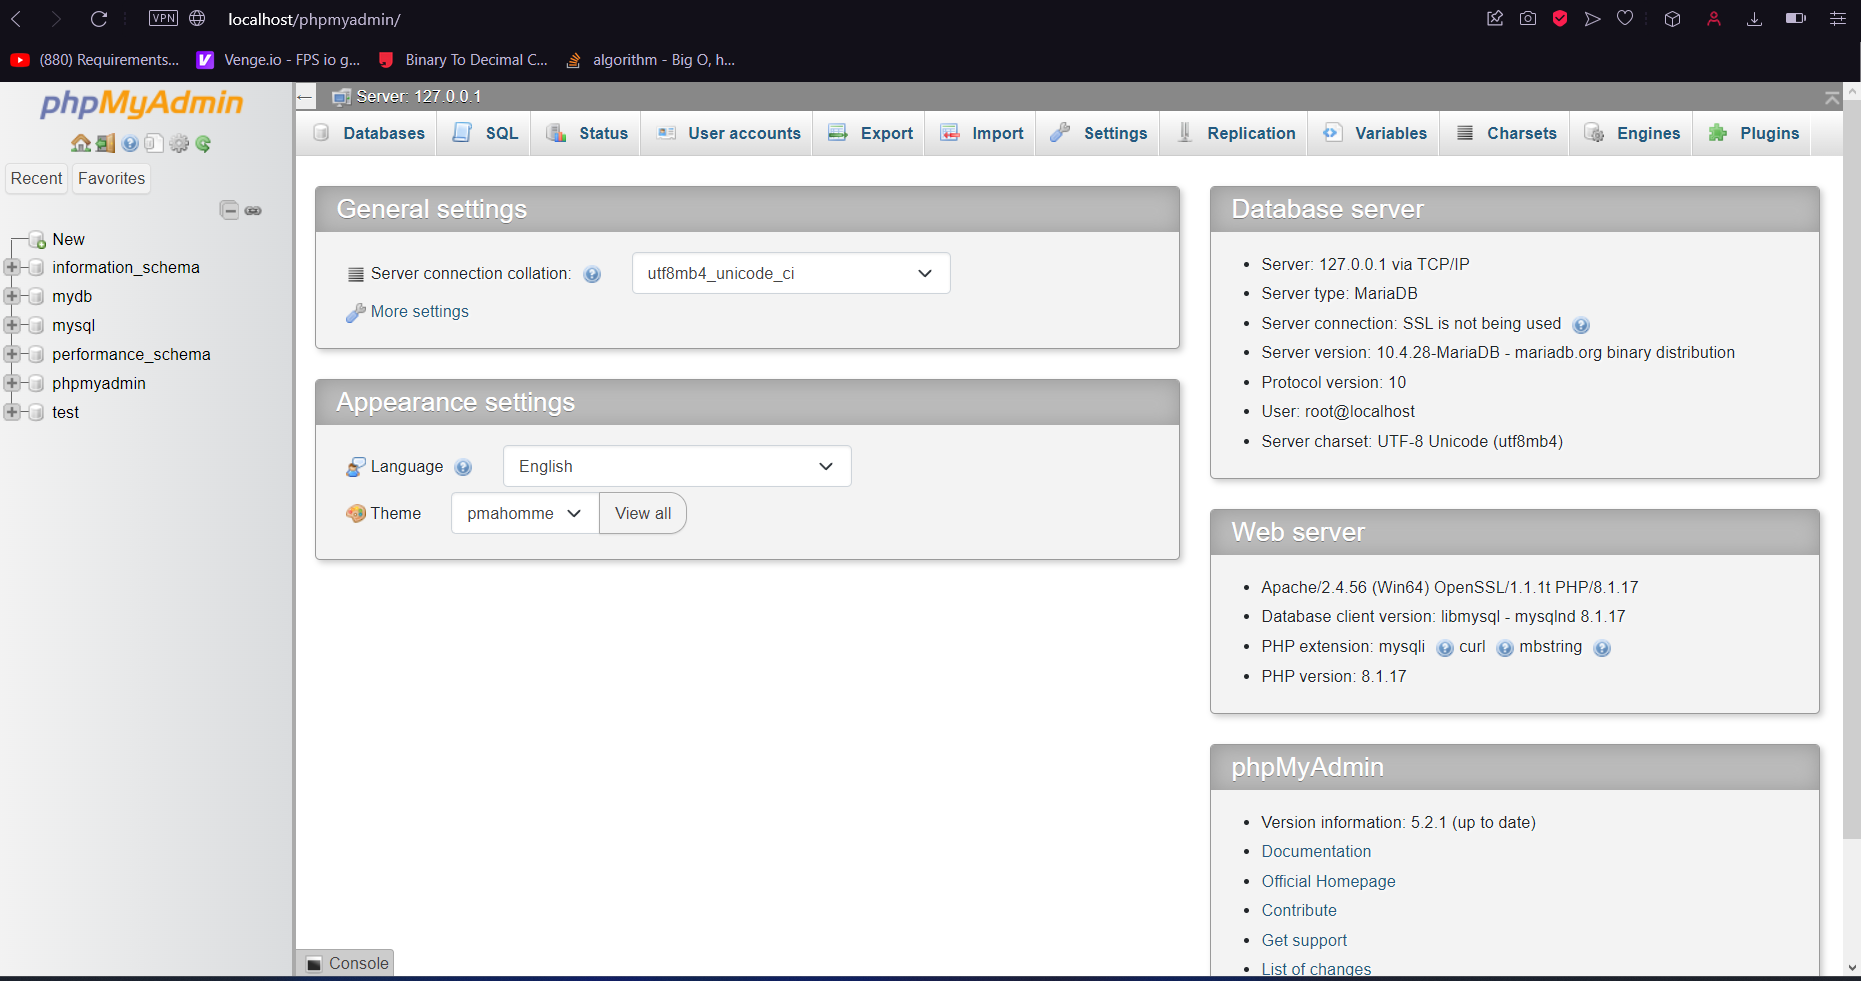
Firstly we need to have a database at the backend if you don't have an external Database or you do not have the CPanel credentials or you are just practicing and using XAMPP Apache and MYSQL. You need to run XAMPP. If you are not familiar with how to work with XAMPP you can find out how to run XAMPP and where to place your folders to make them work with PHP by clicking this link. Assuming you have turned on XAMPP places your folder in the htdocs folders and started Apache and MySql. we will go to the local host page I will go to mine. If you have done everything correctly You should be seeing something like the image below.
Configuring XAMPP error:
If for some reason even after turning your XAMPP you encounter an error. Go to your XAMPP and check what is your admin Port
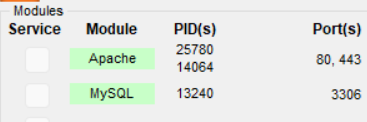
My port is the default one 80 but if you have any other port other than 80 only searching localhost/phpmyadmin would not do the trick you have to specifically target the Port on which the server is started for that you can copy this template
localhost:[portnumber]/phpmyadmin
replace the port number with whatever your port number is. After that, you should be on the same page as me.
Creating Database
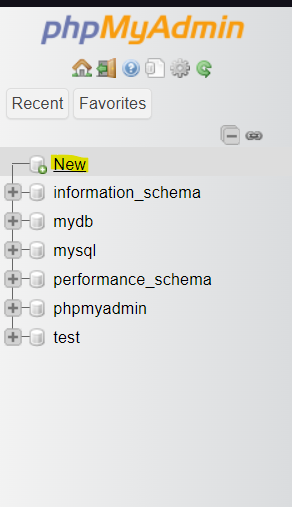
Now that you are on the PHP myadmin page. click on the new database button on the left side.
when you click on that You would see something Like this Do not worry the number of already created databases Might vary.
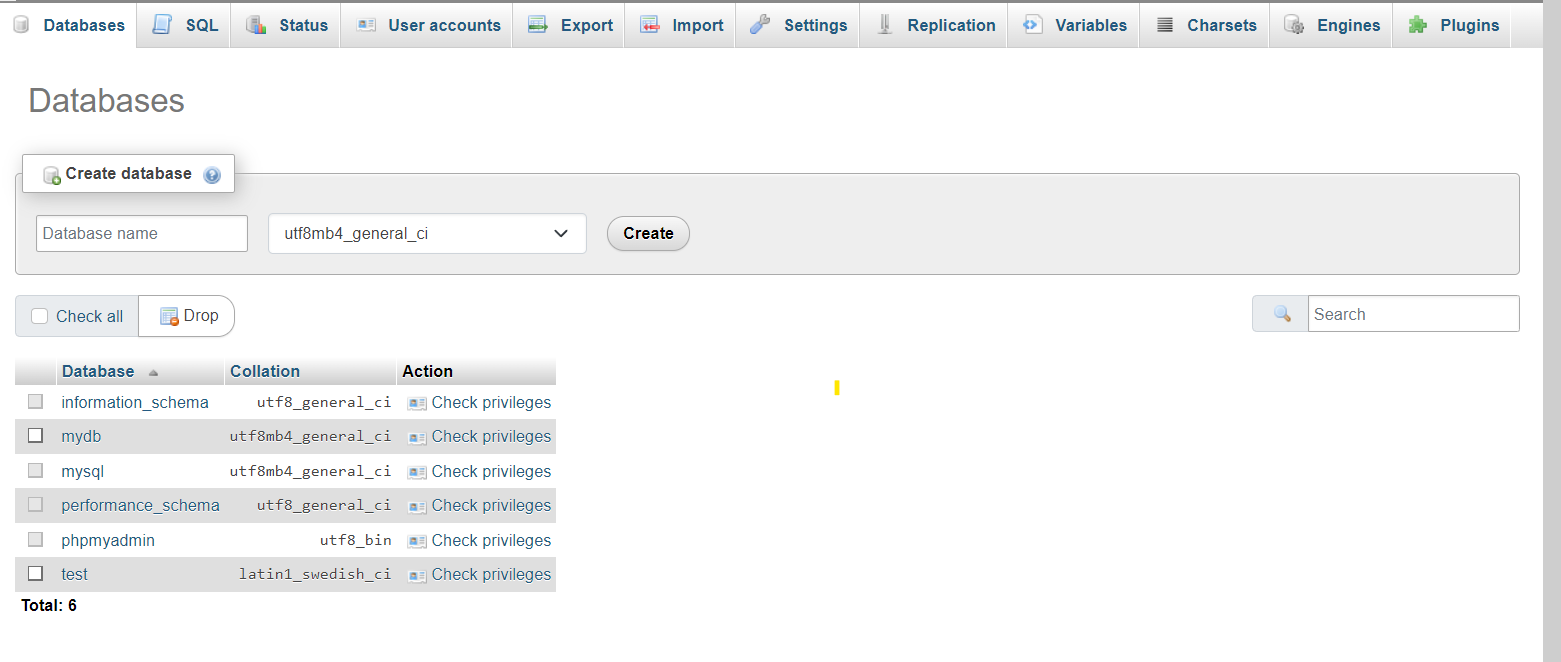
Enter a name for your database I would go with mydb and click create. After clicking Create you should be seeing something like this.

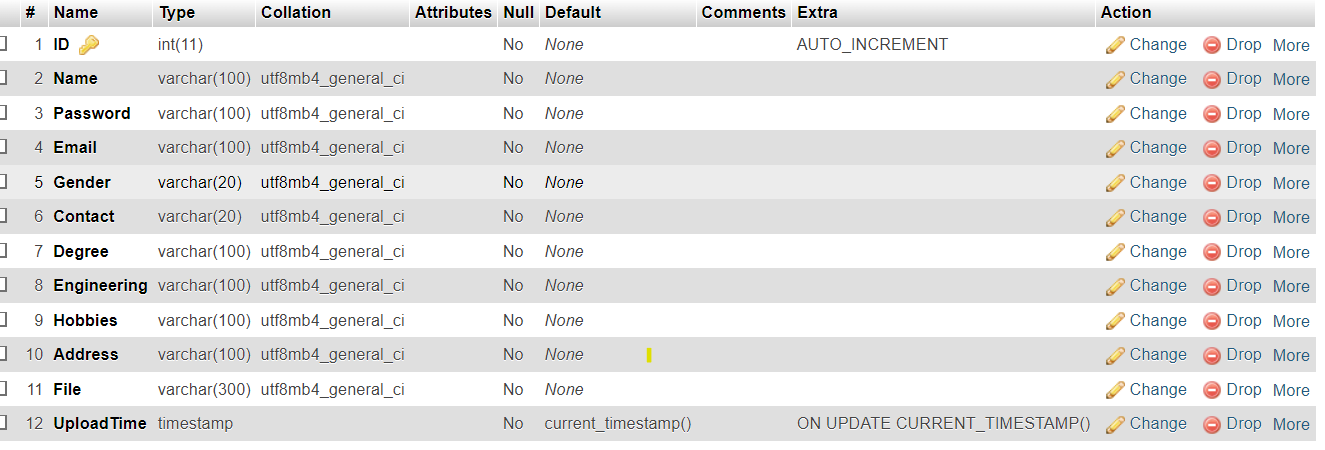
Choose the number of columns you want to have now the number of columns would depend on the form you are generating. For this form, we require 12 columns. one for each input field and 2 for the file input. One for Path and one for the time the file was uploaded on. Do remember all of the input fields have varchar as their data type except the time column where we are using a time stamp. We are also using an ID variable at the top. It is an auto-increment variable. Your table structure should be matching this at the moment.
Writing the PHP code
Now that you have created your database. Let's move to the PHP code. Firstly we will link to our database. The database I will be using is mydb.
Database Linking
for linking we will be using the mysqli_connect() the code connection is given below.
<?php
$link = mysqli_connect("localhost", "root", "", "mydb");
if ($link->connect_error) {
    die("Connection Failed");
} else {
    echo "Successful";
}
we also need to pass credentials to the mysqli_connect function we currently do not have a server we are working with the local host so we will replace the server link with a local host, The username is Root, but By default, Root has no Password. and lastly we will enter the database name. Moving on we will check if the connection was established or not. We had stored the connection credentials in the $link variable. so we will use the link variable to perform all the actions regarding the DB connection.
Importing Form Variables
Moving on We will be importing all the variables from the form into PHP. for that remember we added names to each of the input variables we will be using. First, you will create a variable in PHP for all the input fields and import the form variables into them. The code for that would look like this.
$name = $_POST['name'];
$password = $_POST['password'];
$email = $_POST['email'];
$gender = $_POST['Gender'];
$contact = $_POST['contact'];
$degree = $_POST['Degree'];
$Engineering = $_POST['Engineering'];
$Address = $_POST['Address'];
$checkbox1 = $_POST['Hobby'];
$chk = "";
foreach ($checkbox1 as $chk1) {
    $chk .= $chk1 . ",";
}
Create a variable
to define the method you are using in your form POST or GET
enter the name of the element in the form
you might have noticed why we are using a for each loop well we have two check boxes and a user can select multiple hobbies so that's why we will create a string for hobbies that will have a "," in between to differentiate between Hobbies.
File Submission and uploading Code
Now we will move to write the code for sending the data to Database and moving the file to the actual upload folder that is created on our server.
First, we will create a target directory folder and store in it the name of the folder where we want the files to be stored.
We extract the filename from the input variable we created in our form.
We extract the file type from it and then we create an array of all the file types we want to allow to be submitted.
you can check the code below.
$targetDir="uploads/";
$fileName = basename($_FILES["file"]["name"]);
$targetFilePath = $targetDir . $fileName;
$fileType = pathinfo($targetFilePath, PATHINFO_EXTENSION);
$allowTypes = array('jpg', 'png', 'jpeg', 'gif', 'pdf');
after that, we will check if the submit button is clicked and if a file is uploaded or not. we will also check if the uploaded file's extension is in the allowed types or not. then we will write our query to insert the data into the database. if any of the things is missing we will display the relevant status message as an error.
if (isset($_POST["submit"]) && !empty($_FILES["file"]["name"])) {
    if (in_array($fileType, $allowTypes)) {
        // Upload file to server
        if (move_uploaded_file($_FILES["file"]["tmp_name"], $targetFilePath)) {
            // Insert image file name into database
            $insert = "INSERT into data (Name,Password, Email,Gender,Contact,Degree,Engineering,Hobbies,Address,File,UploadTime)
            VALUES ('$name','$password','$email','$gender','$contact','$degree','$Engineering','$chk','$Address','" . $fileName . "', NOW())";
            $link->query($insert);
            if ($insert) {
                $statusMsg = "The file " . $fileName . " has been uploaded successfully.";
            } else {
                $statusMsg = "File upload failed, please try again.";
            }
        } else {
            $statusMsg = "Sorry, there was an error uploading your file.";
        }
    } else {
        $statusMsg = 'Sorry, only JPG, JPEG, PNG, GIF, & PDF files are allowed to upload.';
    }
} else {
    $statusMsg = 'Please select a file to upload.';
}
rest of the things are simple one piece of code that you should understand from the following is this.
if (move_uploaded_file($_FILES["file"]["tmp_name"], $targetFilePath)) {
            // Insert image file name into database
            $insert = "INSERT into data (Name,Password, Email,Gender,Contact,Degree,Engineering,Hobbies,Address,File,UploadTime)
            VALUES ('$name','$password','$email','$gender','$contact','$degree','$Engineering','$chk','$Address','" . $fileName . "', NOW())";
            $link->query($insert);
            if ($insert) {
                $statusMsg = "The file " . $fileName . " has been uploaded successfully.";
            } else {
                $statusMsg = "File upload failed, please try again.";
            }
in this we check if the file move is successful and the file is uploaded to the server then we run the Insertion Query. we store our query in the insert variable. the query is structured as
INSERT into [table name] ([column name] separated by commas) values([form variables] separated by commas).
We call the link variable and call the query func on it and pass our query as a parameter. Now I will send an example data to my form and see if it works or not.
Accessing the form
To access the form using the server you need to do the following go to your browser and enter the URL like this localhost:[portnumber]/[foldername]. Here folder name is the name of the folder in htdocs.
Adding data to form
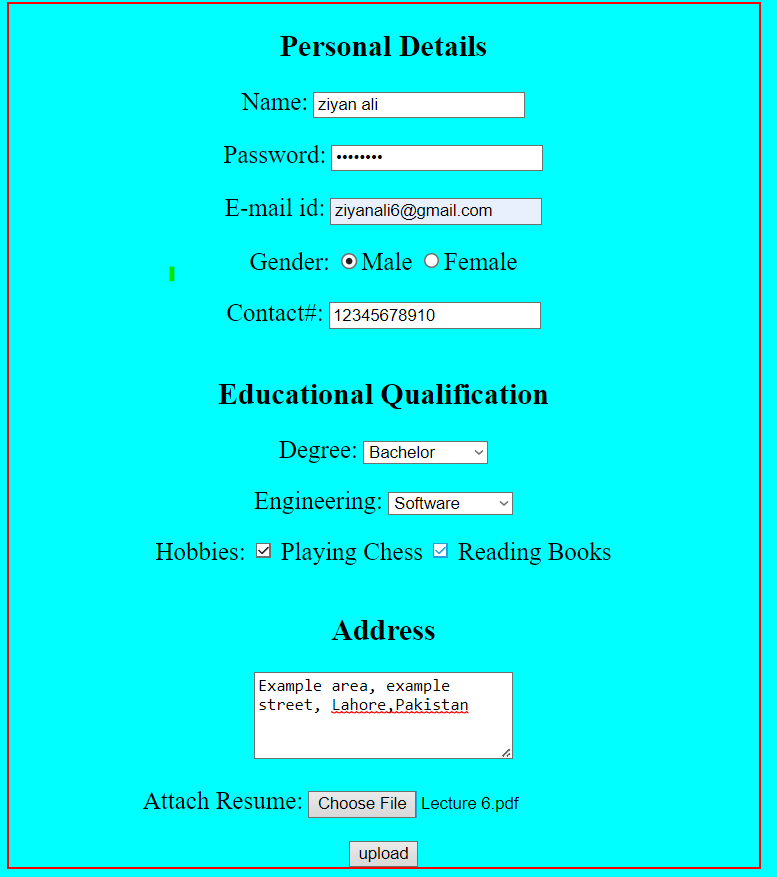
I will be adding the following data to my form. after clicking Upload I will go and check if the data was added or not
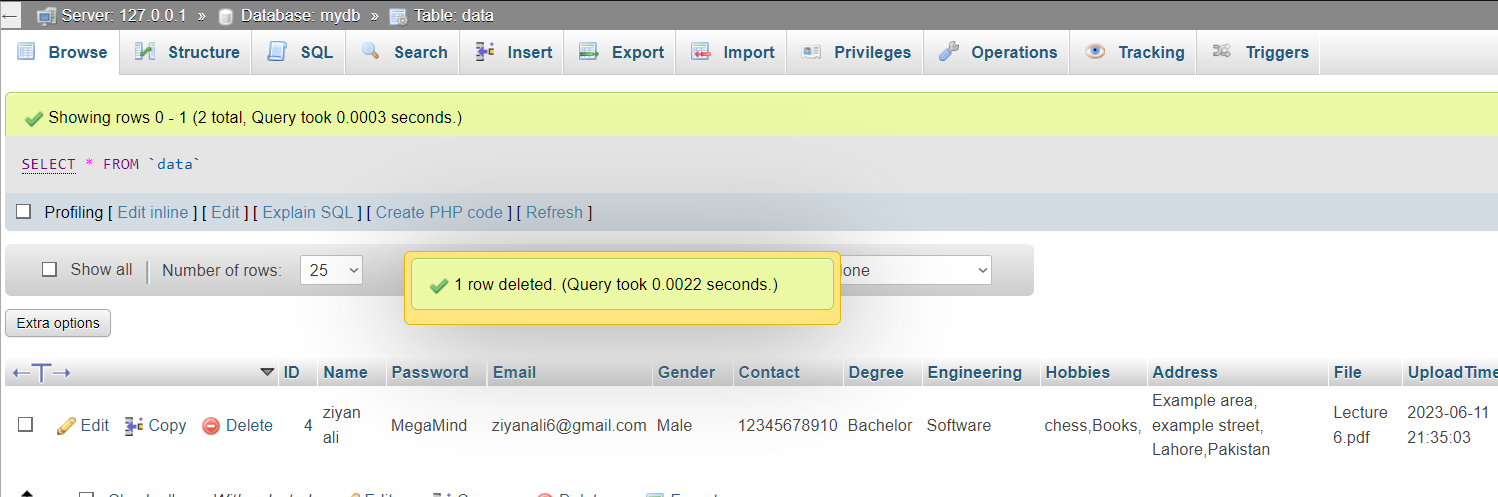
Checking if the data was submitted
To check go to localhost:[portnumber]/phpmyadmin and select your database and your table. I checked mine and here is the record stored in the database.
You can find the files for this project at this GitHub link

